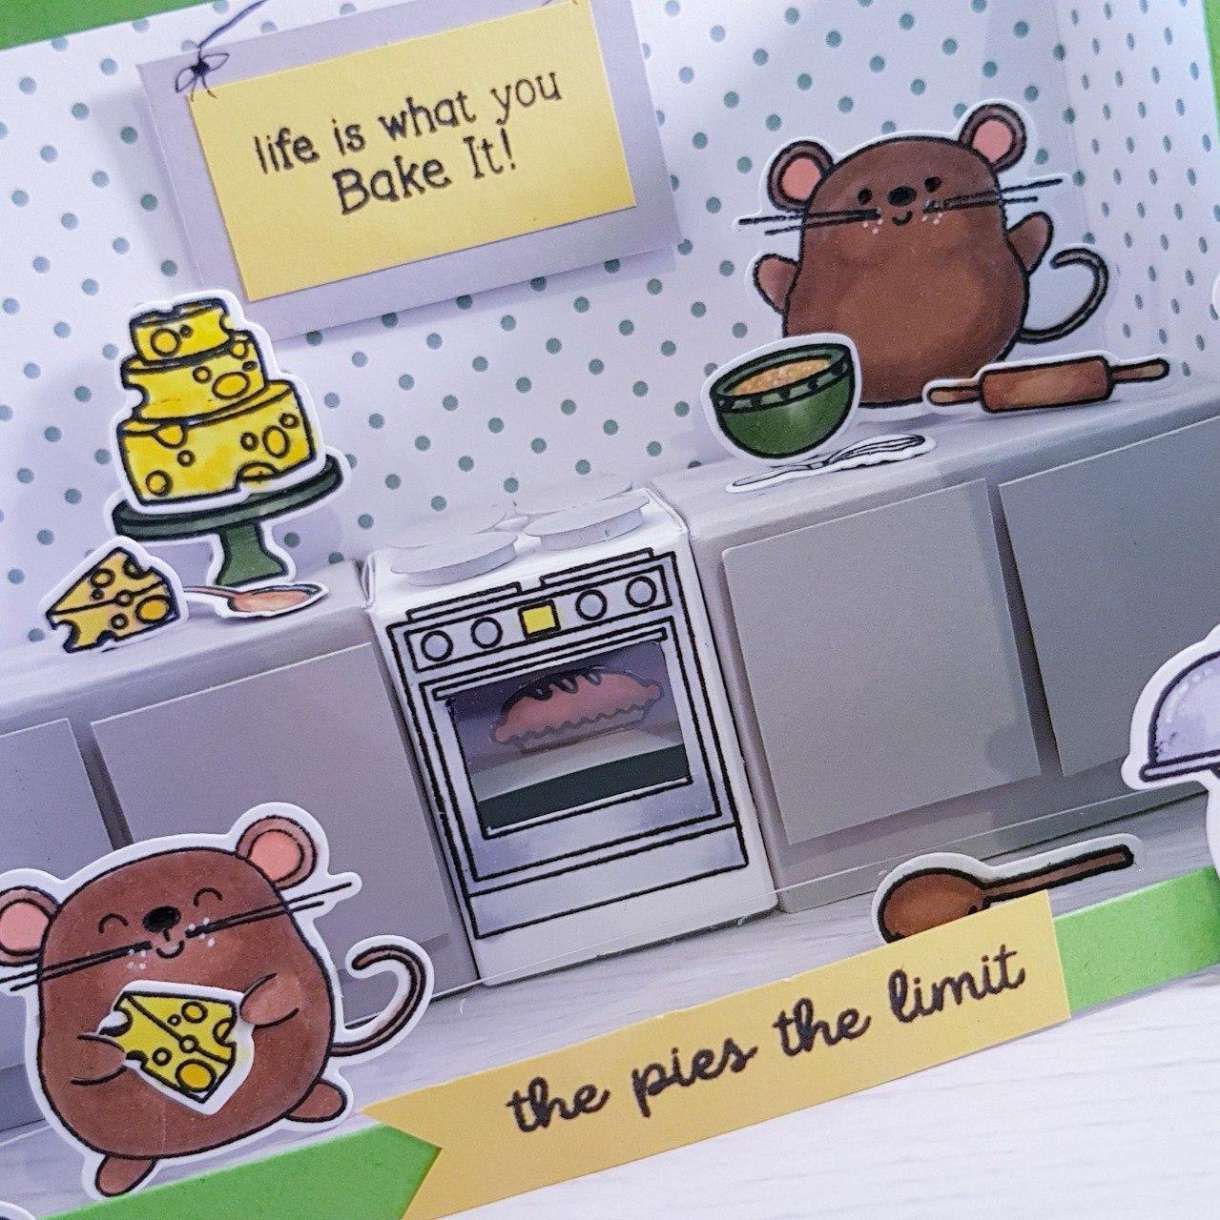
Life is What You Bake it! Shadow Box
0
Posted on 22nd March 2021 by Alison Pendlebury-Brown
Filed under

I can't resist creating 3D scenes. My craft room is getting full of them now haha. So when I saw the new green and yellow cardstock I knew I needed to create a little scene featuring the mice and cheese that I used in the cheese wedge that was up on the blog on 22nd of July.
For this cute little kitchen-themed shadow box you will need:
- Perla Sirio Colour Card 290gsm
- Apple Green Card Plain 240gsm
- Giallo Woodstock Paper 110gsm - brand new yellow colour coming soon.
- White Card Plain 250gsm
- Anita’s PVA Tacky Glue 120ml
- Stick it! 3D Foam Dots (152 pcs)
You will also need:
- A small piece of clear acetate for the oven window
- Coordinating patterned card or paper for the background wallpaper
- Colouring pens or pencils
- Time for Tea Designs 'Bake my Day' and 'Baked with Love' stamps and dies or similar
- Craft knife
- Scoreboard


Instructions:
1. Starting with the shadow box itself cut 2 pieces of green card measuring 21cm x 10cm each.
2. Score each piece at 14cm and 20cm.
3. From one piece cut an aperture out measuring 11.5cm x 8.5cm (I used a rectangle die but you could cut the shape out using a craft knife. This then creates a window at the front so you can see the scene inside the shadow box.


4. For the oven cut a piece of white card measuring 9cm x 7cm and score at 0.5cm, 3cm, 6cm, and 8.5cm. Turn around to the shortest side and score at 0.5cm and 3cm. It will look like the following diagram. Follow this diagram to cut out the areas with the hash marks throught them.
5. To create the base cupboards cut 2 pieces of grey card measuring 11.5cm x 7cm and score at 0.5cm, 3cm, 8.5cm and 11cm. Turn around to the shortest side and score at 0.5cm and 3cm. It will look like the following diagram. Follow this diagram to cut out the areas with the hash marks through them.

6. Stamp the oven image onto the oven shape in the centre panel from the 'Bake My Day' stamp set.
7. Cut out the oven's window and back with a small piece of acetate so that you can see into the oven.

8. Assemble the oven and base cupboard pieces by gluing along the tabs to create box shapes.
9. Line the inside of the back and sides of shadow box with your chosen patterned paper and assemble the box.
10. Glue in the cupboards and oven inside the shadow box.
11. Cut 4 circles in grey card approximately 1cm in diameter and fix to the top of the oven with foam pads to create the rings of the stove. In grey card cut 2 rectangles measuring 3cm x 2.5cm and add foam tape onto the back and affix to the front of the cupboards to make doors.

12. Stamp, colour and die cut all your chosen images from the T4TD stamps sets or similar.

13. Assemble all the pieces inside and around the shadow box as you wish.
14. Stamp the sentiments on yellow card. Mount the sentiment 'life is what you Bake it!' onto grey card and hang on the wall inside the shadow box. This makes it look like it's a wall decoration.
15. For the sentiment 'the pies the limit' cut a tail into the piece of yellow card and glue onto the shadow box frame.
And there you have a cute little scene where the mice are happily baking and eating cheese. It looks like heaven :)
I hope it provided you with some inspiration to create your own. If you do create your own we'd love for you to share it on the papermilldirect's social media pages with the hashtag #papermilldirect :)
Thanks for reading.
Take care and remember ... life really is what you make it (or bake it).
Ali x


Nobody has commented yet
Be the first to comment on this article by using the form below.