Magical Christmas Wishes
0
Posted on 24th July 2015 by Craig Laird
Filed under All Papercraft Tutorials

Hello, and thank you for popping across to the Papermilldirect blog. Today I have decided to create an elegant christmas card that would be perfect for that loved one or close friend just to let them know you are sending them Christmas wishes. Christmas time is the one time of the year where we send the most cards to friends, family and loved ones. Most of the cards made need to be easy, simple and quick because you have so many to make. However, there are some cards that you spend that extra time on to really make them special and elegant.
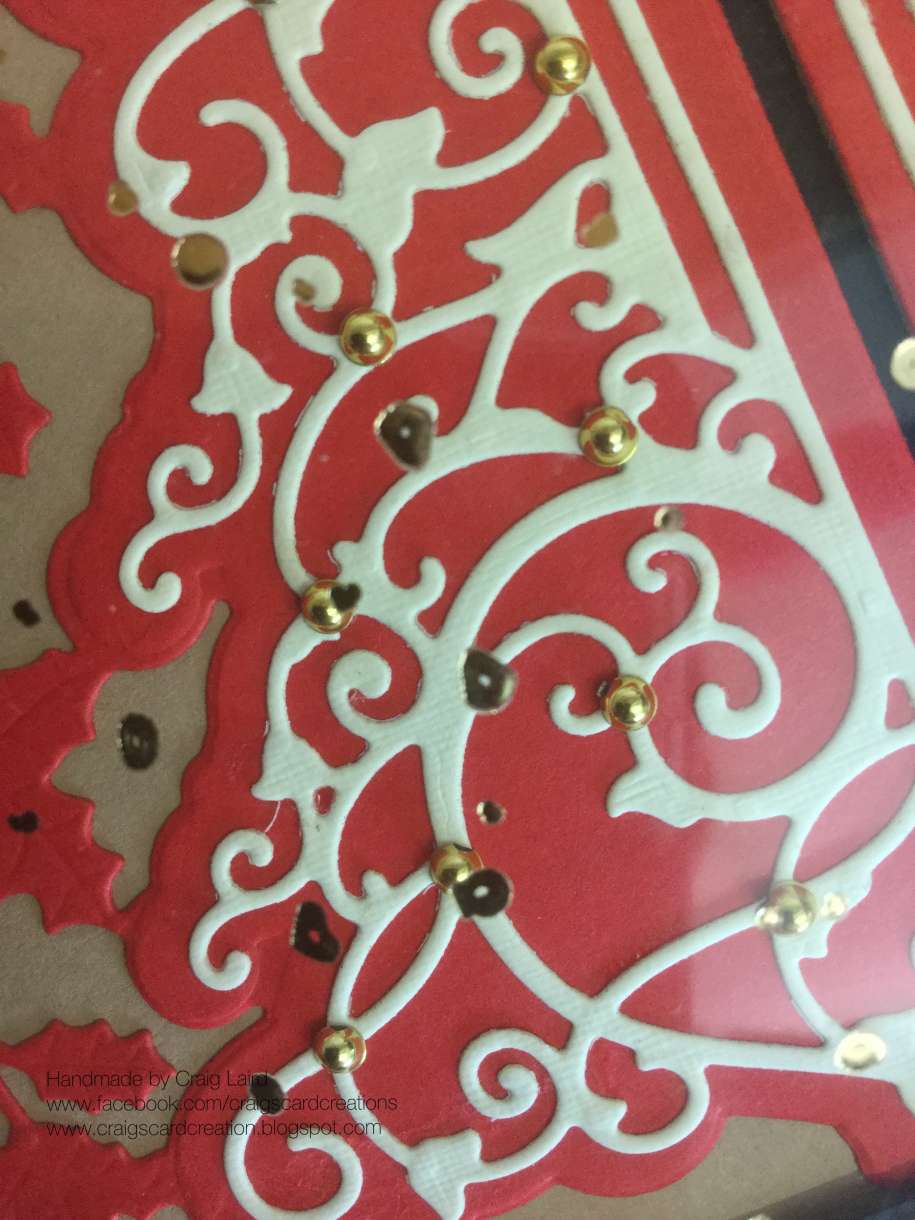
Gold pearls, gold foiled acetate, die cut detailed Christmas trees and die cut flowers,these details make this card card extra special and elegant, handmade with love and care. The whole card has been made from products from Papermilldirect, Couture dies, Hunkydory Crafts and Tattered Lace. All 4 in my opinion bring top quality to this creation. It's a card that could be given in a matching detailed box using all the same products or it could be used as home decor year after year.
Materials Needed
Papermilldirect Card - Back smooth card 250gsm. Buff smooth card 260gsm. Christmas red plain card (+ insert) 240gsm. Rich cream linen card 255gsm. Ivory smooth card (+Insert) 250gsm.
Stix2 - 12mm Double sided tape FPAL27321225. 3D foam pads S57137. Silicone glue S57100. A4 die cut release sheets S57316. PVA glue with metal tip S56890. 6mm red liner tape S57090. Low tack stencil tape S56994.
Additional items - Couture stylish christmas die Create and Craft. Gold foiled snowfall acetate Hunkydory. Metallic 3mm gold pearls Hunkydory. 4mm black pearls Hunkydory. 8x8 card blank Craftwork Cards. Diane and Kathleen trio dies - Tattered Lace. Font; FREEHAND 591BT.
Luxury Christmas Card Tutorial
1 - Cut a piece of Black card to 7 3/4" x 7 3/4". Then each layer starting with the Buff, Christmas Red then Cream linen should all be 3mm smaller than the previous layer. Ie Buff will be 3mm smaller than the Black, Christmas Red will be 3mm smaller than the Buff and finally the Cream linen will be 3mm smaller than the Christmas Red. Cut a piece of gold foiled snowfall acetate to 7 1/4" x 7 1/4" and place over the Rich cream linen layer using red liner tape.
2 - Die cut the Holly leaf background from the die using Christmas Red card stock and layer onto a piece of Buff card stock. Repeat this step again using the other side of the die. (The die comes in 2 piece, the left and right handside)
3 - Cut another piece of Black card to 6 1/4" x 6 1/4" and layer your Holly leaf background on top.
4 - Next, die cut both sided of the stylish tree using Rich cream linen card . When it comes to detailed dies like these, I like to use die cut release sheets from Stix2. This really helps the ensure that once thie die has cut the card stock, it really does just fall out despite all the detailed elements and swirls.

Picture above has a layer of die cut release sheets inbetween the die and the Rich cream linen card.

This picture above shows how once the die has been die cut, you are left with the main die cut stylish tree but also the die cut release sheet. Dont bin this, one side has a wax texture. If you place the release shape wax side facing down onto card stock , place a tea towel over the top and using an iron on low heat, iron for afew seconts. Peel the shape away and leave to cool a minuite ot two. This will now create a resist shape and you can now go over this area with distress inks or chalks etc and the wax will release the colour.

A4 release sheets by Stix2 anything. 10 in a pack.

5 - Using PVA glue with metal tip, place the die cut stylish tree onto the Holly leaf background. Add some gold pearl gems dotted over the swirls.
6 - Cut a piece of gold foiled snowfall acetate to 6 1/4" x 7 1/2" and score 1/4" in from each end of the acetate. Curve around the edges of the die cut area using the 6mm red liner tape.
7 - Type and print your sentiment onto Ivory smooth card and layer onto Christmas Red, Buff and Black card stock. Attach to bottom of your card using double sided tape.

8 - Die cut your flowers using your chosen dies and layer on top of each one. Add a Black gem in the centre and attach the flowers to the card base using silicone glue. Add 3 Black gems to the top right of the acetate dome.

9 - Print out your insert onto Ivory smooth card and layer onto Christmas Red card and place inside your card.
Thank you for taking the time to view my blog post this week. I hope you like what I have created.
Craig x


Nobody has commented yet
Be the first to comment on this article by using the form below.