Bon Voyage Card - Step by Step Tutorial
0
Posted on 20th July 2016 by Angela Dodson
Filed under All Papercraft Tutorials, Card Making Ideas, Design Team, Projects And Cards By Occasion

Hello, it’s Angela here again to share a Step by Step Tutorial with you. This week the Design Team are working on the theme of ‘Bon Voyage and Travel’ and we have a new special offer card (Light Grey) and a featured cardstock colour (Ocean Blue) to play with.
I have created a simple design using red, yellow, white and blue cardstocks to complement the Light Grey to give a bright and fun card design.
Step by Step:
Create a card base by scoring & folding a sheet of A4 PMD Ocean Blue card, then trim to give a 5.5” square card base. Cut a square of Light Grey card approx. 5” and a square of plain white card approx. 4.5”.
Use a border die or punch to create a wave effect from PMD Ocean Blue and Marine Blue card and adhere across bottom of white card square using d/s tape or glue.

Using a boat die, cut shape from Light Grey card and Post Box Red card, snipping into the grey shape and layering on top of the red shape to give a grey boat with reds sails.
Die cut a sun shape from PMD Daffodil Yellow cardstock

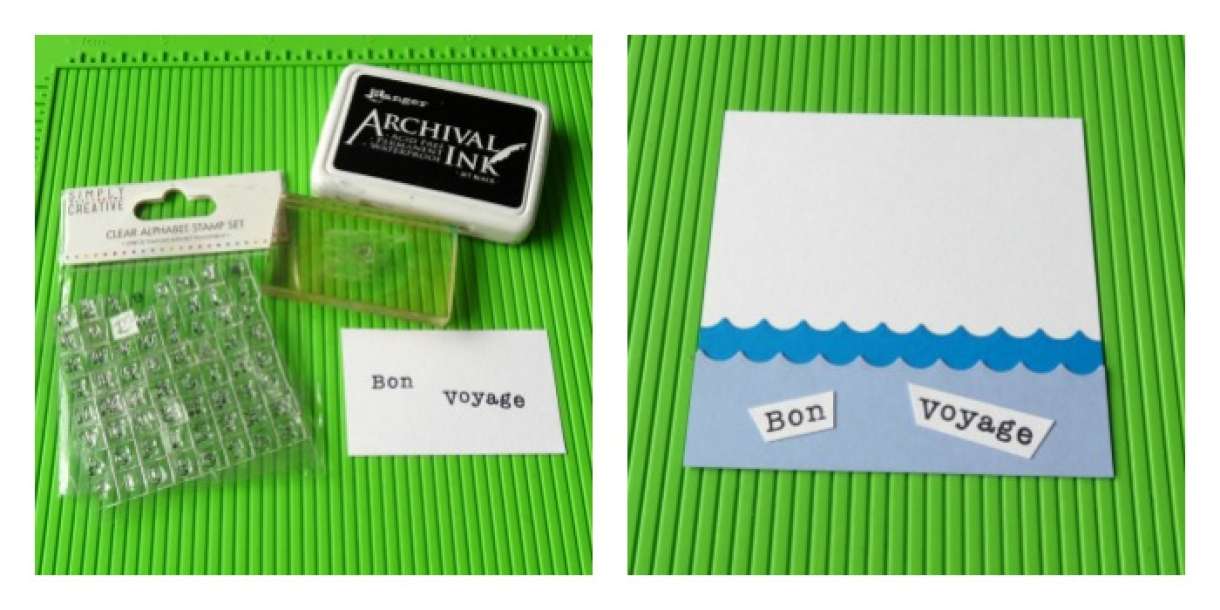
Using an alphabet stamp set and Black ink pad, stamp letters to spell out ‘Bon’ ‘Voyage’ onto plain white card.
Cut words out, angling ends and glue to bottom of waves section at angles.
Mat Light Grey card square onto Ocean Blue card base using d/s tape. Add ‘waves’ panel on top using d/s tape. Glue yellow sun to top LH side of card front allowing it to overlap the matted panels.
Use 3D foam pads to adhere the little boat to card front, positioning so it sits on the waves.

I love the simple shapes and block colours which give a clean, bright and happy feel to the design. There are lots of colours in the Papermilldirect cardstock range, so you could have lots of fun creating different coloured boats and adding embellishments or personalisation. This design would also be suitable for a male birthday, perhaps adding numbers to the sail on the boat and a ‘happy birthday’ sentiment in place of the Bon Voyage?
Materials Used:
Light Grey Card (Special Offer) - Papermilldirect
Ocean Blue Card (featured Stock card – Papermilldirect
Marine Blue, Plain White, Post Box Red, Daffodil Yellow Card - Papermilldirect
Transport Die Set – First Edition
Weather Die Set – First Edition
Waves Border die or Punch
Alphabet Clear Stamps – Simply Creative
Black Ink, D/S Tape, Glue, 3D Foam Pads
More projects and ideas using Papermilldirect products can also be found over on my blog, link here: http://pollypurplehorse.blogspot.co.uk/


Nobody has commented yet
Be the first to comment on this article by using the form below.