Hello Sweet Friend
0
Posted on 7th April 2021 by Alison Pendlebury-Brown
Filed under
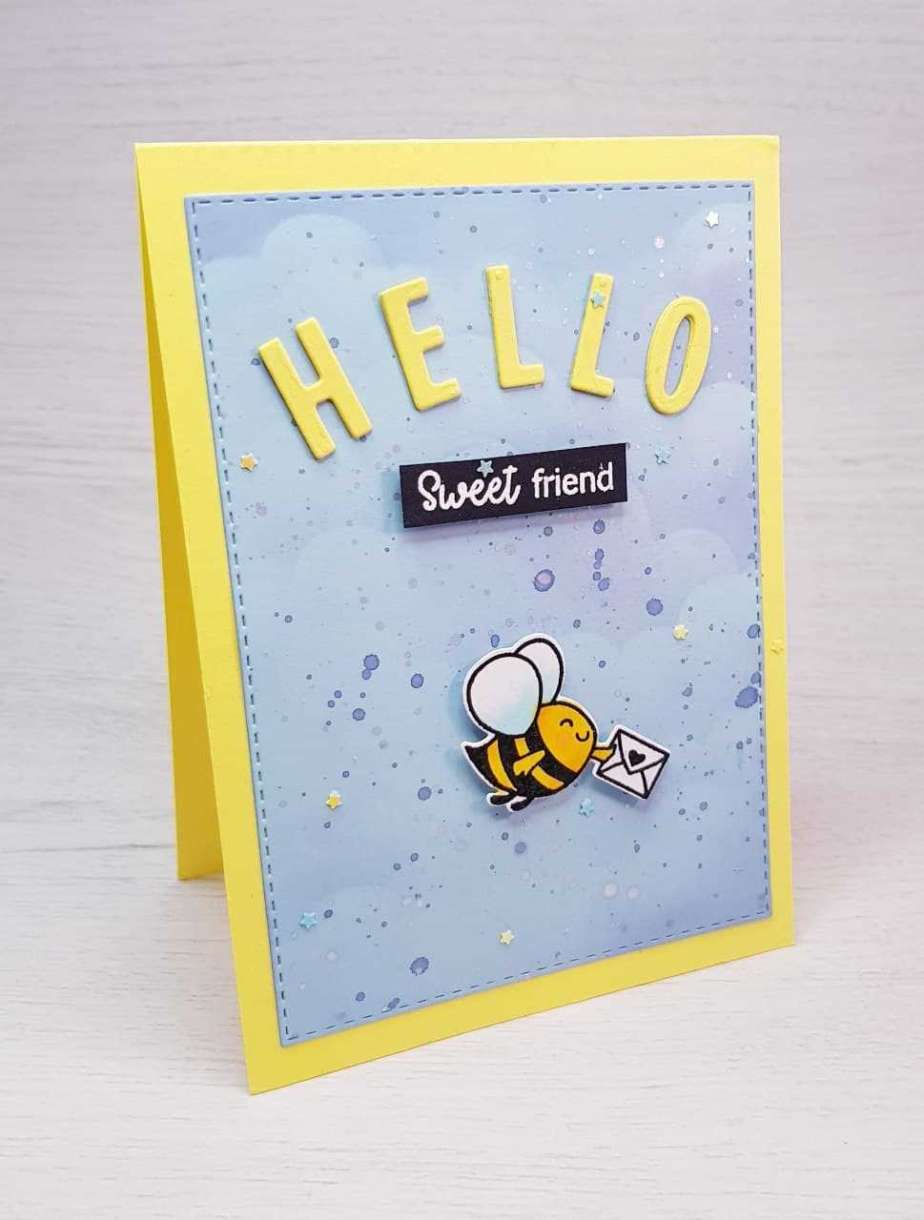
Yay, it's April and it's finally Springtime! I cannot tell you how much I've been wishing my life away, waiting for Spring to arrive :). To celebrate warmer days, I've created this cute little top-folding, A6 sized card featuring a cute little bee delivering a card to say "Hello Sweet Friend".
To create this card you will need:
- Daffodil Plain Card 290gsm
- Celeste Sirio Colour Card 290gsm
- All Media Artist Paper Natural White 300gsm
- Black Plain Card 240gsm
- Anita’s PVA Tacky Glue 240ml
- Stick it! 3D Foam Squares (940 pcs)
You will also need:
- Bee stamp and dies - I used Time for Tea Designs' Bee Happy coordinating stamps and die set
- Alphabet dies
- Sequins or flat-backed pearls - I used Lucy's Things - Itty Bitty Stars
- White metallic paint for splattering - I used Kuretake Starry Colors watercolours in colour no. 906 white gold
- Clear embossing ink
- White embossing powder
- Colouring medium - I used Copic markers
- Cloud stencil or cloud edge die to create your own stencil
- Blue ink pad - I used Ranger's Distress Ink in Stormy Sky


Instructions:-
- Create a card blank using the yellow card. Cut an A4 sheet in half widthways and then fold one piece in half to create an A6, top-folding cardbase.
- Create a mat measuring 3.75" x 5.25" in the light blue cardstock.
- Die-cut the word 'Hello' twice using your alphabet dies and layer one on top of the other for extra dimension.
- Stamp, die-cut and colour in the bee. I coloured the wings in pale blue and added Kuretake Wink of Stella for a little sparkle to the wings.
- Stamp and emboss your sentiment - I chose to use 'To a Sweet Friend' from the stamp set, masking off 'to a', so that it reads 'Hello Sweet Friend' when combined with the die-cut 'Hello'.

If you do not have a cloud stencil but do have cloud edge dies you can create your own stencil. To create a disposable stencil you can simply cut it from cardstock. If you'd prefer to create one that you can clean and re-use, you can also laminate the cardstock.
To create the cloud stencil:
- Cut a piece of scrap, thin cardstock the length of your dies (see my image above)
- Laminate the cardstock (reserve the remaining laminated plastic, as this is great for making shaker windows in another project)
- Die-cut the cloud edges (see image above) - you may need to pass it through your cutting machine several times to cut through the 2 pieces of laminate and the cardstock


- Using your new stencil and blue ink, blend a cloudy sky background. You can, of course, skip this step completely if you'd prefer a plain blue background.
- Splatter the card using the white gold paint for some sparkle.

Now that you have all of your pieces, it's time to assemble.
- Mat the blue sky layer to the yellow cardbase
- Glue down the 'Hello' die-cut
- Mount the sentiment and the bee on foam squares and adhere to the card
- Sprinkle and glue your chosen sequins around the card.
I adore this stamp set as I love bees - I'm so excited to see them buzzing around in my garden, collecting pollen from the flowers.
I truly hope this simple little tutorial provided you with some inspiration. We'd love to see what you create, so please tag us on social media using #papermilldirect
Stay safe, see you next time.
Ali x


Nobody has commented yet
Be the first to comment on this article by using the form below.