Iris Fold Paw Print Card
0
Posted on 3rd November 2022 by Samantha Burrow
Filed under Card Making Ideas

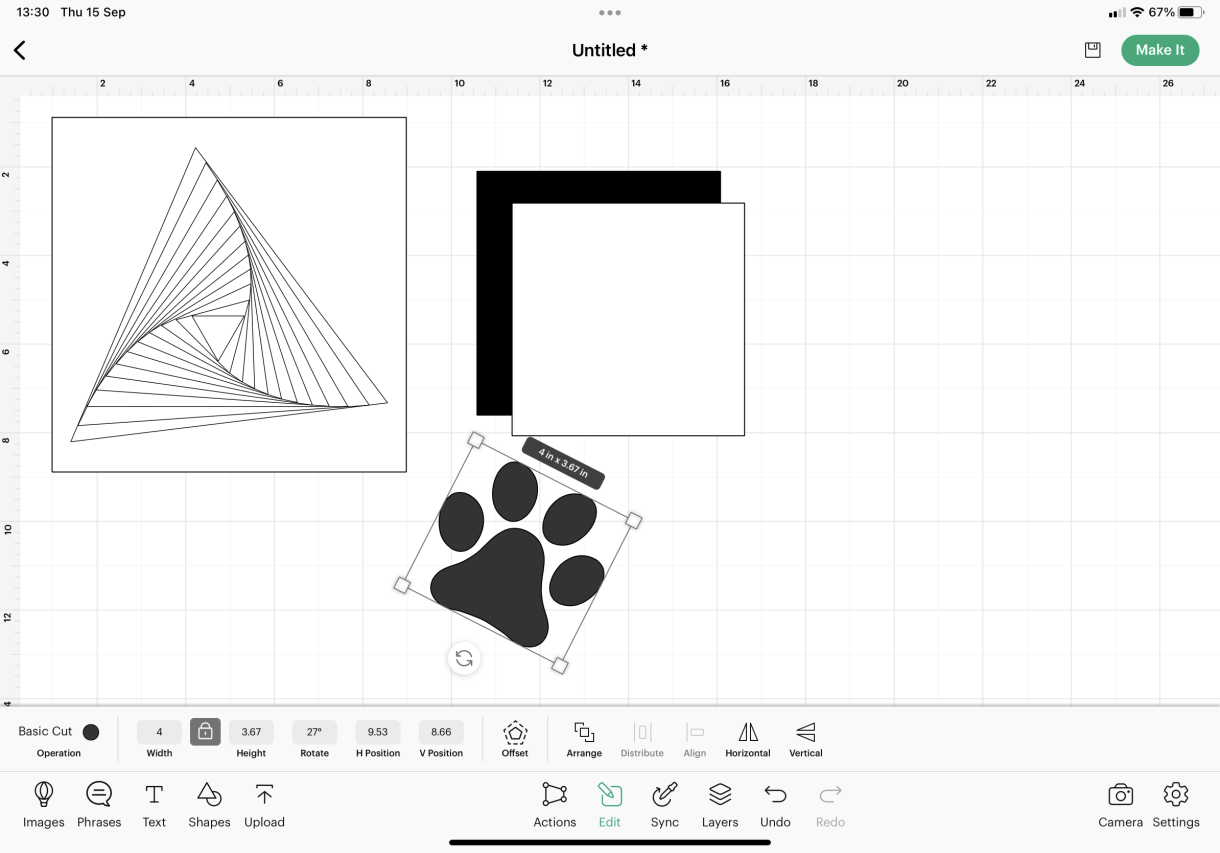
To begin with insert a square and a triangle shape onto your design space canvas.

Change the square to white, resize to 8” x 8” and move to the side for later.
Change the triangle to draw function and select a preferred pen, I used black to keep it simple. Duplicate the triangle until you have 12 in total.

Using the Edit Panel, adjust the size and rotation of each triangle to the following measurements:
- (s) 1.18” x 1.02” - (r) 180°
- (s) 1.71” x 1.48” - (r) 165°
- (s) 2.23” x 1.93” - (r) 155°
- (s) 2.70” x 2.33” - (r) 148°
- (s) 3.18” x 2.75” - (r) 142°
- (s) 3.65” x 3.16” - (r) 137°
- (s) 4.19” x 3.63” - (r) 132°
- (s) 4.71” x 4.08” - (r) 128°
- (s) 5.28” x 4.57” - (r) 124°
- (s) 5.90” x 5.11” - (r) 120°
- (s) 6.60” x 5.71” - (r) 116°
- (s) 7.21” x 6.24” - (r) 113°

Adjust the positioning of the triangles until they all touch at the corners. This is best done manually and may take some trial and error as simply using ‘centre align’ won’t result in the correct alignment.

Select all the triangles together and in the Action Panel, click Group. Place the group of triangles over the white square and click Attach. This will be your Iris fold template, and the Cricut will draw it out for you.

Insert a two more square shapes, change the colours to match your chosen card and resize to your finished card size. For this design, I used a Papermill Direct extra large square card blank, which is approximately 5.85”, so my square shapes were 5.5” and 5.25”.

In the images, search for Paw Print and choose your favourite one. I selected image ID #MA94352D for my design. You can also create your own paw print by welding different shapes, like ovals, together.

Adjust the size and rotation to fit nicely in the centre of your card, mine was resized to 4.0” x 3.67” and rotated about 27°.
Align the paw print with the smaller square and in the Action Panel, click Slice. Delete the excess slices showing in the Layers Panel until you just have your square shape with a paw print cut out of it.

If you would like to add a sentiment, insert two squares and change their sizing and colour to coordinate with the main design. Insert text, type your wording and change the font to one with a writing style. After adjusting the font size and letter spacing, align the text over the smaller square and click attach.

When you are happy with your design, click Make It and follow the onscreen instructions to cut your card pieces. When cutting the Iris fold template, I used plain printer paper on the setting copier paper.

When your design has finished cutting, stick the border panel to the front of your card blank. Lay your Iris Fold template face-up on a hard surface. Place your paw print panel face-down over the top of the template. Secure in place with some tape.
Using strips of your chosen paper, fold them in half and tape down onto the paw print panel, taking care to line up the fold edge with the lines on the template. Start with one of the outermost lines, moving in a clockwise direction, keep adding layers of your folded paper, making sure you tape them tightly and securely.
When all the layers are stuck down, add a small piece of card or paper to the centre, (I chose a piece to match the border panel on my design). Check all the folds are secure, use extra tape if needed. Stick 3D foam pads around the card, flip over and secure to the front of your card.
Stick your sentiment to the smaller border panel, and stick to the front of your card using 3D foam pads.


Nobody has commented yet
Be the first to comment on this article by using the form below.