How to make a peacock picture.
0
Posted on 16th May 2018 by Jennifer Squire
Filed under
Hi everyone,
Today I am going to show you how to make a peacock picture, which you can give as a gift or keep for yourself! This does take quite a bit of time to make and definitely one that needs a die cutter. Barring that I found it very enjoyable to make and hope you do to.
You will need:
- Die cutter and scanner
- Tracing paper
- Pencil
- Scalpel
- Cutting mat
- Glue pen
- 4x Yale Blue Lustre Print Card (papermilldirect)
- 4x Henna Lustre Print 300gsm (papermilldirect)
- 12x Xmas Green Lustre paper (papermilldirect)
- 2x Intensive green 120gsm (papermilldirect)
- 2x Intensive Yellow Plain card (papermilldirect)
- 3x Pastel Lilac Plain paper (papermilldirect)
- 2x Intensive Blue Plain 160gsm
- 1x Purple Grape Plain 240gsm
- 1x Black card 250gsm
- 1x White card 250gsm

First of all I did sketch of my peacock design. I have included on all the pictures a scale line so that you will hopefully be able to reproduce the sketches to the right size.

From my sketch I traced out the main body and then scanned the image into my machine, I use a brother cut and scanner.

I then traced on to paper the top layer of the main body on to paper and scanned that into my machine.

I then traced from my sketch the head, the beak, the white face markings, the black eye and the purple head feather and scanned that into my machine.

You then trace around the lower purple part extending it as far as you like. If you look at images of peacocks you can see that they have a beautiful purple part on their lower body.

Then I drew out and scanned into my machine some feathers that will go on top of the purple body part.

You can then start cutting out. First of all you cut out your lower purple body part. I used Purple Grape Plain for the lower body part and cut out the feathers out of the Xmas Green Lustre paper.

You then stick them roughly on to the purple body, you can stick them in any way you like.

You then need to cut out some squiggly lines. You can draw these in any way you like and scan them into your machine and cut them out, I used Pastel Lilac Plain paper for this. You will need quite a few of these as you need to cover the whole body part. You will also need to use your scalpel to trim the edges.

Then you start to glue these on top of the the purple body part. You can cut lengths with a scalpel to fit into gaps as you go along.

You keep glueing bits down until it is completely full. Once this is completely you can then move on to making your tail feathers.
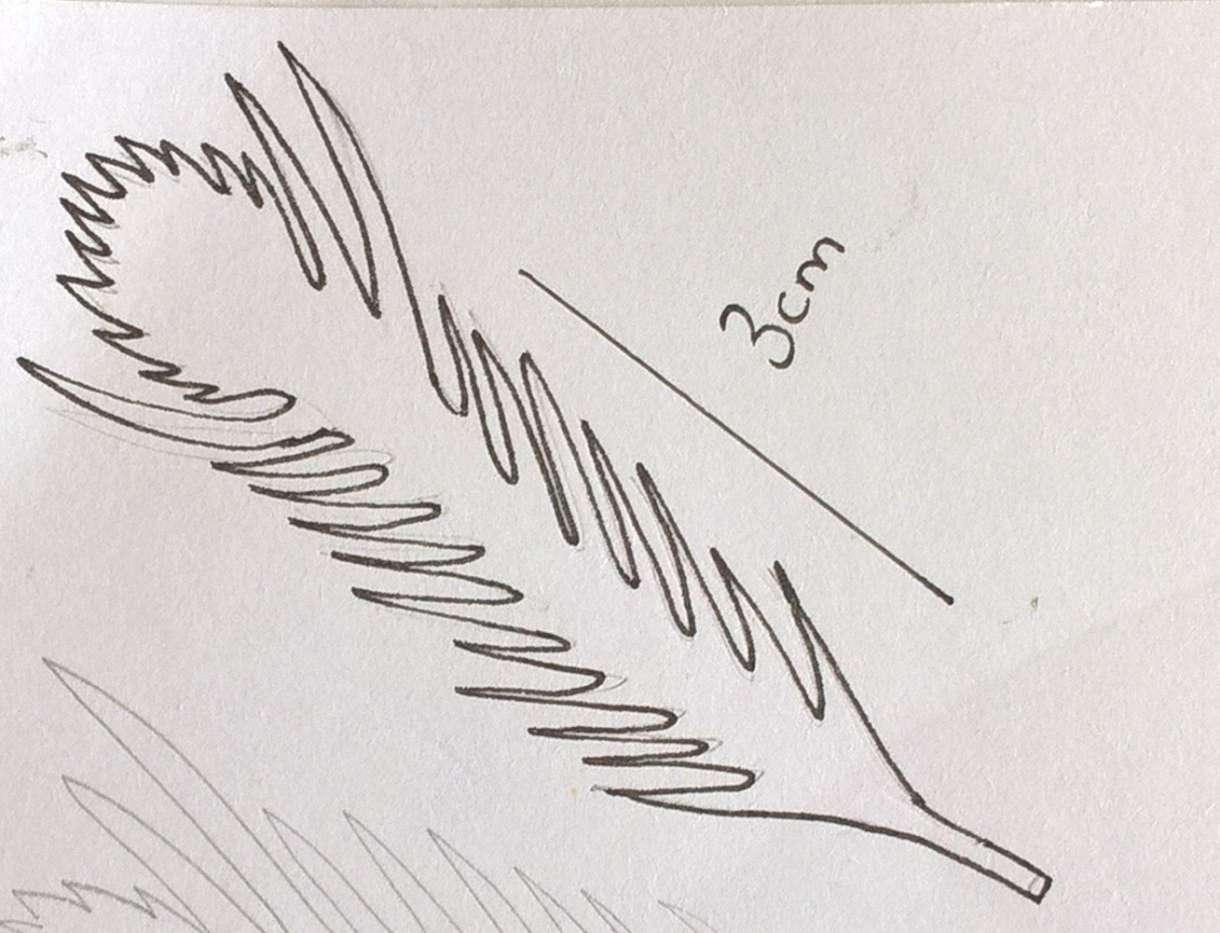
First of all you draw out your feather and then scan it into your machine. My feather is 6.7 cm's long and 1.6cm's wide. You can use my design or devise something yourself. For the tail feathers I use Xmas Green Lustre paper. You will need a sharp blade for this, a new one is ideal. I cut out about 40 small feathers, it is up to you how many you want to cut out it all depends on how thick you want your final tail feather.

You then cut out your gold ovals, on my machine there is an oval shape, if yours doesn't have one a circle will do just as well. You cut them out using the Henna Lustre Print. My oval is 10mm in length and 7mm in width, it doesn't have to be exact. You then stick your gold oval in the centre of your feather head.

Then using the same oval shape cut out using the Intensive Blue Plain card smaller ovals. The size is 6mm in length and then you need to cut smaller ovals than that out of the Yale Blue Lustre Print to the size of 4mm. Next is the fiddly bit, anywhere in the gold oval you can stick down your blue plain card oval and then the smaller Yale blue oval on top. Once you have done this to all of your small feathers you can move on to making the larger ones.

Draw and scan into your machine your large feather. Mine is 12.2 cm's from the middle tip to the bottom.

You will need to cut out 40 of the longer feathers along with 40 gold ovals sized 20mm in length.

You then stick the large ovals on to your feathers.

Then you stick the lighter blue oval on to the gold, the light blue size is 11mm in length.

Then the dark blue circle which are 7mm in lengths. Repeat this until all of your feathers are complete.

We then move on to the green middle body feathers. On my machine I have a small half circle with a tip at the bottom. If you do not have this a circle will work just as well.
First we are going to start off with the smallest size. You need to cut out 6mm sized black circles you will need 45 of these, this allows for spares. You then need to cut out, in the intensive green, the same number of 45 at size 4mm. You then stick these green circles on top of the black ones. leaving a black rim. You then start to stick these on top of one another in a line as shown in the image above.

You will need one row of 3, one row of 8, two rows of 9 and one row of 12.

You then stick these rows on top of one another, the picture best shows the positioning.

You then repeat the process but upsizing the green circle to 5mm and the black circle up to 7mm. You then stick the green circles on to the black circles. You need to do two rows of 9 circles, and two rows of 11 circles. You then stick these on top of one another, as shown in the image.
You then again repeat this process for the larger circles. The black is now 9mm and the green is 7mm. You do three rows of 10, one row of 8, one row of 7, one row of 6, one row of 5, one row of 4, and then one row 3. You glue these on top of one another starting with largest row moving up to the smallest. The image shows you the exact positioning.

Now you can move on to cutting out other parts of your peacock.
First you cut out the head feather. Bring up you earlier scanned in image of your head feather. You cut this out of the Purple Grape Plain card.
Next you need to cut out little blue kidney shapes from the Yale blue card, about 4mm in length. Then you stick these on to your purple feather head, as shown in the image. Repeat the same process on the top of the head purple feather.

Then from your earlier scanned in images of your peacock, cut out the bottom base and top layer base of your peacock using the Yale Blue Lustre Print card.

Then you stick on your head feather using the blue base of the peacock as a guide. Once that is done you can then stick your base of your bird on to the yellow background, using your Intensive Yellow Plain card A4 as the background. You want to stick the bird about 1cm from the side, as shown in the image. You then place the green circles roughly on to the bird, as you can see from the image I place the circles in the dip of the bird covering the spike.

Then you place the middle block underneath the smaller sized circles. This is still just to work out your angle, don't glue anything down just yet.

To get the positioning exactly right I placed the top layer of the peacock on top, with the purple bottom body roughly on top. This will help you to work out exactly where you want everything to go.

I then glued these down starting with the smaller block first, then the middle and then the large. When glueing make sure you don't glue the final layer right at the top as you want to be able to slip your feathers underneath.

Grab all of your large feathers that you made earlier and start to build your peacock tail feather skeleton.
You will need your scalpel and mat for this as you will need to cut down some of the longer bottoms. When trimming down to fit make sure you leave enough of the bottom part of the feather so that you can slip it underneath your green circles. Once you have your position of your first large feather put a small amount on glue on the end, slip it underneath the green feathers and press down. Don't put any glue on the gold head as you want them loose so you can stick feathers underneath them.

For the next feather you cut down the end of feather so that it is close to the first one. You repeat the same process of glueing, with only glueing the end and slipping it underneath the feather same as the previous one. Then repeat this with the third. As shown in the image.

This is what the final first line looks like.

You then repeat this process with the next line. As you can see in the image I have placed the line at an angle from the body, this helps to create a fan shape.

This image best demonstrates the positioning of the third line. As you can see I have used some of the discard feather ends to carry on the line.

You can then start to fill in in-between the skeleton with more lines of feathers.

In order to carry on with your fan shape you need to stick down your top body layer of the bird and the purple body part. I stuck the blue body part down first and then stuck the purple body part on top of that. Once you have the right positioning of the purple body and it is stuck down you can position and stick down the feathers on top of it. Make sure you are still not sticking the gold heads down.

This image best shows the placing of the feathers and the angles needed.

You can now starting placing your long feather lines where ever you see fit.

Once you feel that you have your desired amount of peacock rows you can start to fill in with the smaller ones. Don't worry if you still have lots of larger feathers left you can add them in later. Like the big feathers you will need to cut them down to be able to slip them under the green feathers and the larger feather heads.

Then to make each line thicker I filled each line in between with a line of small feathers. The image shows that you will still need to cut them down to fit as you go. You can glue these smaller feathers down completely if you desire or you can still do just the ends and come back to glueing them all down later.

This image shows this more effectively.

You repeat this process for all of the lines barring the longer ones on the purple body body part.
You can now move on to the head by drawing it out and scanning it into your machine.

Then you cut out your different head parts. On the previous sketch you saw that I had done two different white markings, this was to see which worked best. The head is cut out of the Yale Blue card, the eye is the black card, white face marking white card, and the beak is white and cut out again in the pastel lilac plain paper so that you have a white and a lilac beak.

You then get a scalpel and slightly cut down the underside part of the beak so as to leave some of the white beak exposed. You then stick the lilac beak on top of the white beak. Once that is done you can position it on the blue beak outline and and glue down.
You then move on to the white markings. Start with the back of the head marking. You want this to follow the contours of the back of the head. The image shows which way round and where exactly to place it. I then stuck down the white side marking which goes on to the beak and then placed the eye within the white strip. Once your head is completely stuck down you can then stick that on to the peacock body.

You can then go back to filling in and completing your peacock tail feather. You keep going until you are completely happy.

You can then play around with borders and frames.


And there you have your finished peacock! I hope that you were able to follow and create your own individual peacock pictures. Happy crafting.


Nobody has commented yet
Be the first to comment on this article by using the form below.