How to Make a Personalised Mother's Day Gift Box
0
Posted on 23rd February 2015 by Angela Dodson
Filed under 3d Crafts, All Papercraft Tutorials, Design Team, Seasonal Crafts, Mothers Day Crafts

Hello, Angela here to share a Mother’s Day Gift Box Tutorial with you. I’ve sized this box so that you can pop all sorts of goodies inside, and if you want to make an extra special gift it is the perfect size for you to fill with 3” square handmade notecards.
You will need:
- Papermilldirect card in Cream - Any of the card in the Essentials Range would be great!
- Papermilldirect card from the our Lakes Craft colour range. The perfect colours for this are green, purple and blue.
- Love Arch Squares Die Set (356E)– Tonic Studios (or similar to give a 3 ½ “ frame)
- A fun and decorative border
- Mini Blooms die set (D279) – Tattered Lace
- CI-131 Stamp Set – Crafty Individuals
- Promarker pens in lilacs, greens, pinks, pastel blue, skin tones, hair colours– Letraset
- Turquoise Blue Ribbon & pale blue adhesive gems
- Adhesives: Double Sided Tape, Cosmic Shimmer Glue, 3D foam pads
- Tools: Manual Die Cutter such as Big Shot, Scoring Board, Scissors
Instructions:
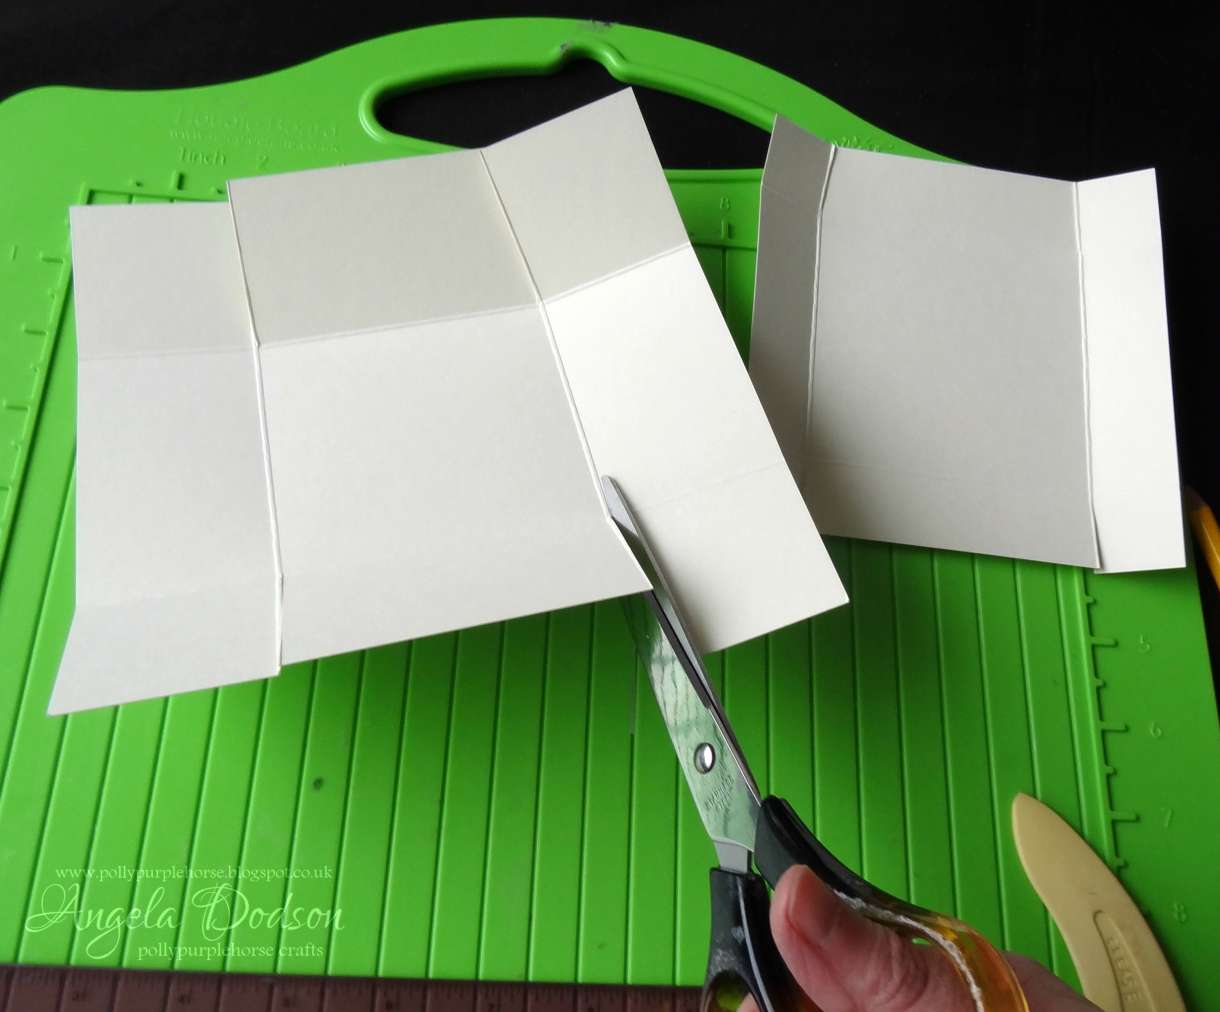
- Cut 1 square of Cream Card to measure 7 ½ “x 7 ½ “and score and fold all round at 2”.

- Cut 1 square of Cream Card to measure just slightly over 5 ½ “x 5 ½ “(adding approx. 1/8” will allow the box lid to be removed more easily). Score and fold all around at 1”.

- Cut into the corner sections of each square as shown in the pics, you may wish to remove a triangle of card at the corners to allow the corners to stick neatly. I like to use a combination of double-sided tape and quick drying wet glue such as Clear Cosmic Shimmer to assemble.

- Next stamp an image of a girl using black memento ink onto cream card. As these are meant to be vintage style images it doesn't matter if you stamp it sketchily or miss a few places, here I have chosen to colour the lighter imprint.
- Colour using promarkers (I used vanilla and blush for the skin tones with a little blue to highlight the eye area) and trim down to leave a small border all around, use a corner rounder if you have one to soften the edges.

- Using the Tonic die set cut a heart doily frame (approx. 3 ½ “square) from cream card and cut the matching back panel from Pale Turquoise card.
- Mat the frame onto of the blue panel and stick using a little cosmic shimmer glue.
- Using double sided tape attach the stamped coloured image into the centre of the panel.

- Using the border punch, punch 4 strips to decorate the sides of the box, use a strip of Pale Turquoise card to back the strips with,

before sticking to the sides of the box, then trim to fit using scissors. (I find that borders line up better if cut in individual strips rather than one continuous strip for the sides of a box).

- Next attach a length of Turquoise ribbon around the sides of the box lid, using double sided tape on the back to secure in place.

- Die cut small flowers from New Lilac card, adding extra shading with a lilac Promarker pen.
- Die cut small leaves from the Spring Green cardstock adding a little shading with a versamark pen or pale green promarker pen.
- Shape flowers before adding to the bottom left corner of the box lid, use 3D foam to attach.

- To finish add some small pale blue adhesive gems to the centre of the flowers.

There are 4 different mini girl images on the Crafty Individuals stamps set, all the same size so you can make alternative versions and also have fun playing with the colour schemes. I chose to use lilacs, blues and greens for this one but there are lots of other shades in the Papermilldirect colour collection that would be perfect for this make too. You could make 4 boxes using all 4 images and use different colour schemes, or you could make some matching mini note cards to pop inside the completed box, or maybe chocolates or other small gifts nestled on pretty patterned tissue paper stamped with the girl images?
So why not get started with making the perfect Mother's day gift this year? With our easy steps and instructions, you can easily make a thoughtful gift that mum will love. For more information on our products, check out our card making supplies today!


Nobody has commented yet
Be the first to comment on this article by using the form below.